Particle Argon Setup
Jake Hosen
Stuff to install first
- A Particle account
- The Particle mobile app for iOS or Android
- Particle Workbench
This tutorial is based on the air quality kit tutorial available from Particle. I strongly recommend reading through that tutorial before you get started.
Get started: assembling and pairing your device
I’ve put together a Youtube video that will help you assemble
your device: 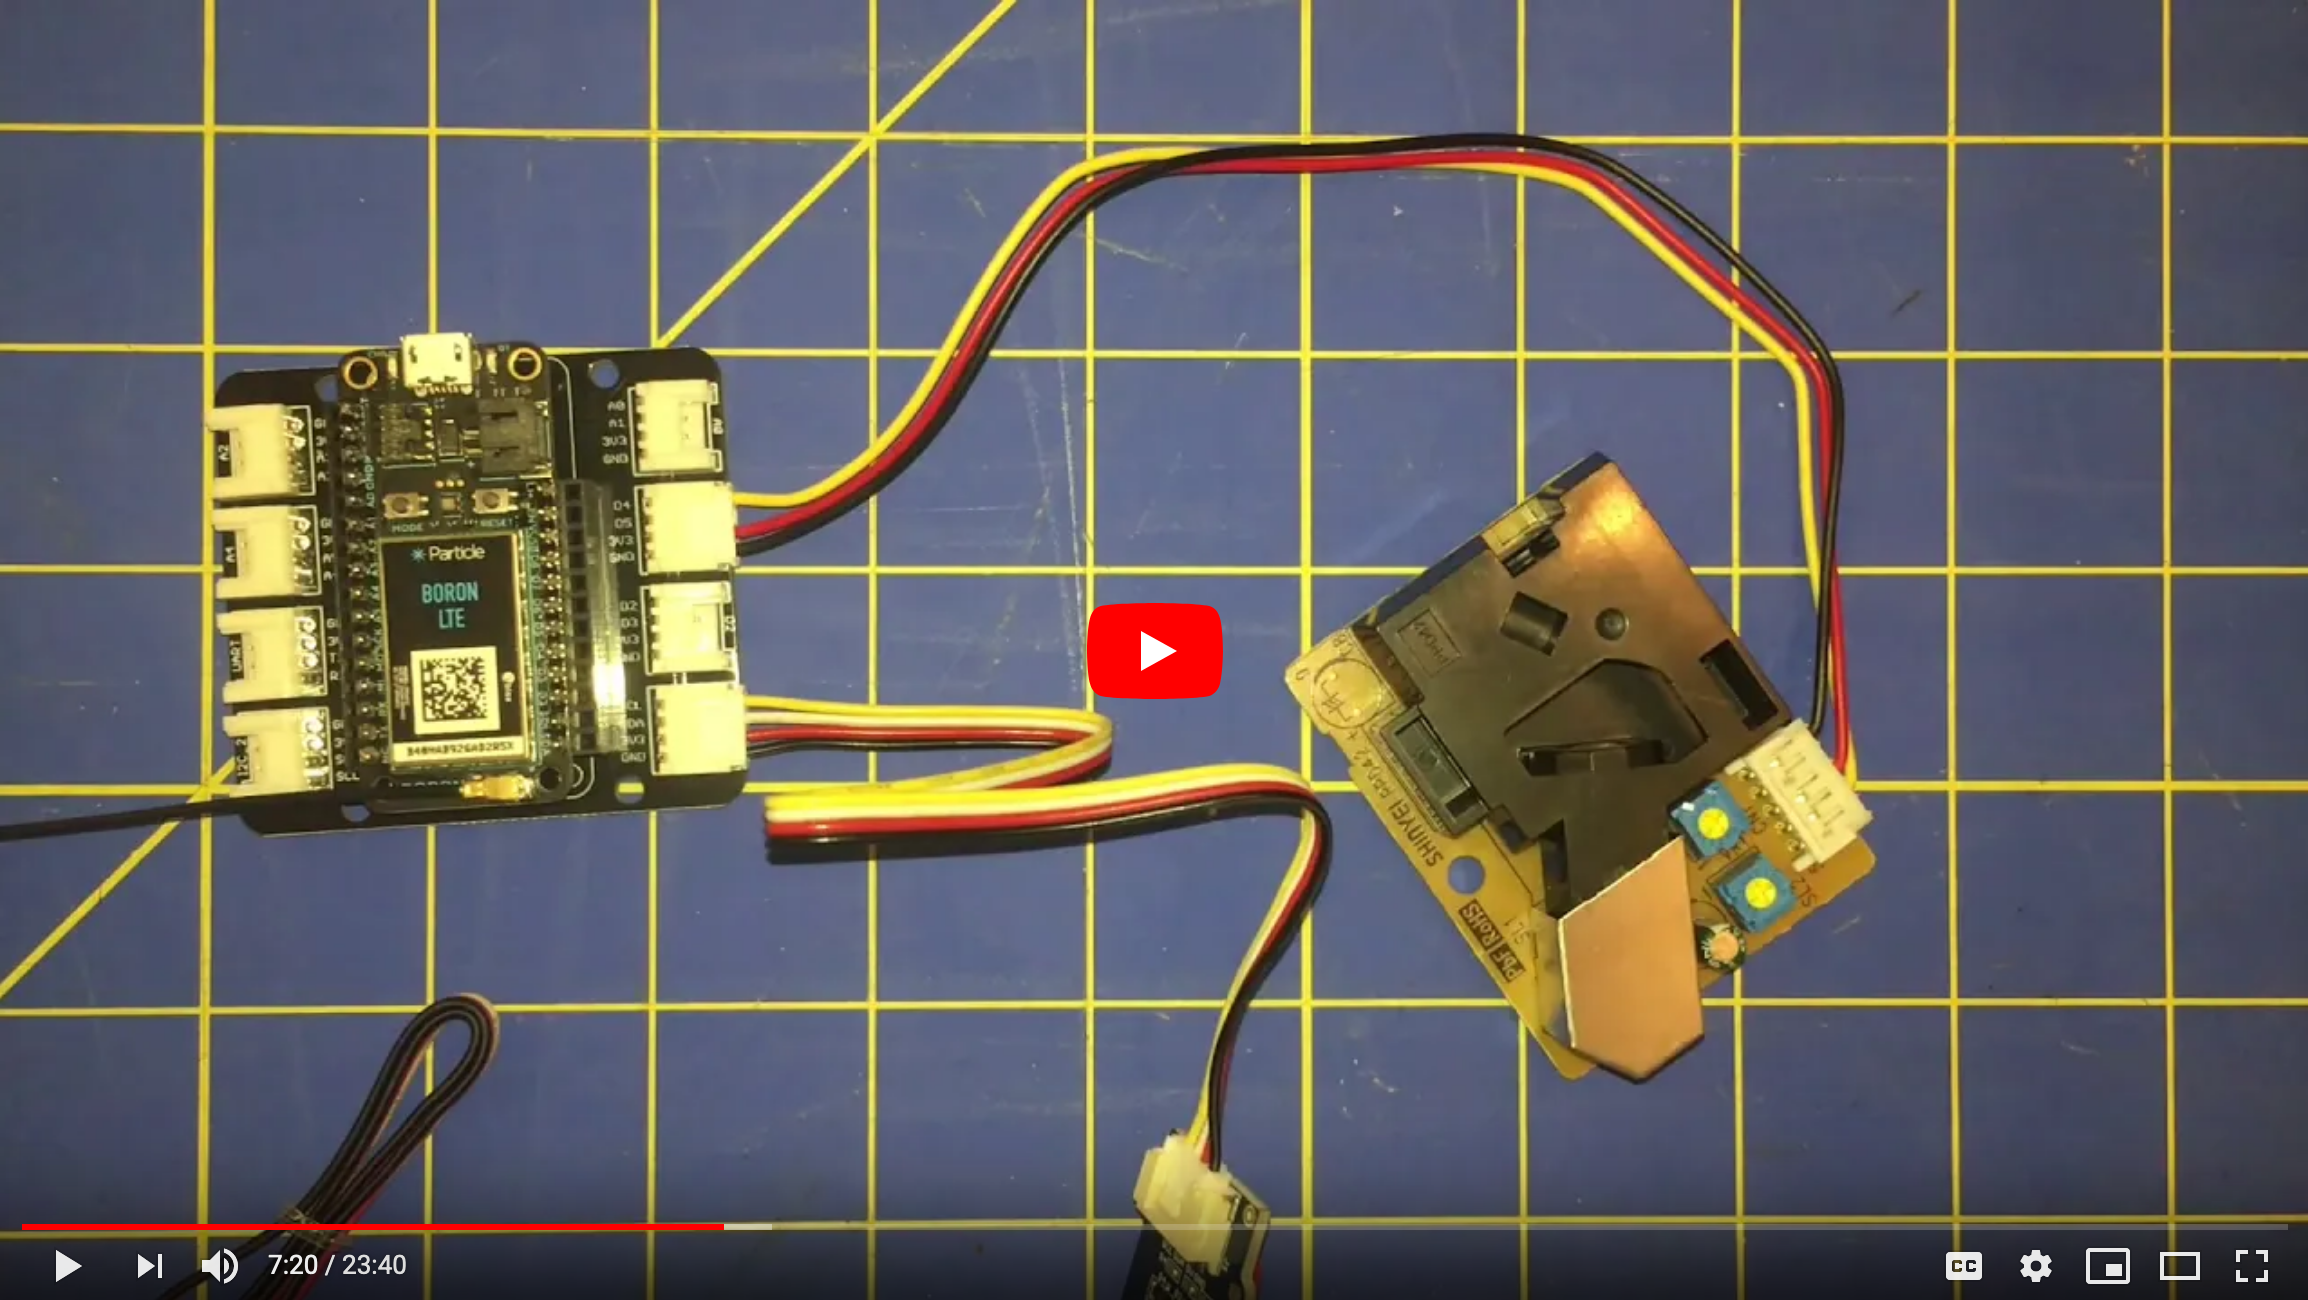
Great, so now you’ve put together your device it’s time to program your device.
Programming your Particle Argon microcontroller
Now that you have the device assembled and paired, you want to plug
it into the computer using the USB cable that was supplied. Next open up
the Particle Workbench (do this by opening Visual Studio Code – commonly
referred to as VS Code). When you’ve done that, you’ll be ready to
follow along with the tutorial in this next video. I recommend watching
the video and then try it for yourself with the air quality kit tutorial
and the video as reference. 
Okay, now that you’ve completed the work in this video, your sensor package is collecting data and sending those data to the cloud. The problem is that now we have to actually save our data to the cloud somewhere. That’s the next exciting part.
I tried to follow the tutorial and video, but I’m getting stuck
That’s totally fine. I’ve included a working version of the code below. Watch this video and I’ll explain how to get started very quickly using this code snippet.
NOTE: The point of this class is to learn how to use these devices in a functional matter. That means I suggest at least trying to work through the code as I describe above and is in the tutorial. That said, it is a little tricky and because we are working remotely it’s not as easy to work through problems remotely. So if you give the above information a shot and it doesn’t work, go ahead and use the script below, but do try to work through the material above – I think you’ll find it beneficial.
Here’s the video explaining how to load the code snippet
below onto your Particle Argon: 
Here’s the code that you past into VS Code following the instructions in the video:
/*
 * Air Quality Kit for FNR498
 * Setup sensor and connect to MyGeoHub
 *
 *
 */
/*
 * Air Quality Kit for FNR498 with Ultra Low Power Mode - Particle Boron
 * Setup sensor and connect to MyGeoHub
 * Modified to include 15-minute sleep cycles for extended battery life using cellular
 */
#include "Particle.h"

SYSTEM_THREAD(ENABLED);

#include "Air_Quality_Sensor.h"
#include "Adafruit_BME280.h"
#include "SeeedOLED.h"
#include "JsonParserGeneratorRK.h"

// Function prototypes
void takeSensorMeasurements();
void publishSensorData();
void enterSleepMode();
void wakeUp();
void initializeSensors();
void initializeDisplay();
int getBMEValues(int &temp, int &humidity, int &pressure);
void getDustSensorReadings();
String getAirQuality();
void createEventPayload(int temp, int humidity, int pressure, String airQuality);
void updateDisplay(int temp, int humidity, int pressure, String airQuality, int qual_int);

#define AQS_PIN A2
#define DUST_SENSOR_PIN D4
#define SENSOR_READING_INTERVAL 900000  // 15 minutes - matches our sleep cycle

AirQualitySensor aqSensor(AQS_PIN);
Adafruit_BME280 bme;

// Power management variables for Particle Boron (Cellular)
const unsigned long MEASUREMENT_TIME = 900000;   // 15 minutes active time for dust sensor readings
const unsigned long SLEEP_PERIOD = 15 * 60;     // 15 minutes sleep in seconds
unsigned long activeStartTime = 0;
bool isActive = true;
bool measurementTaken = false;

unsigned long lastInterval;
unsigned long lowpulseoccupancy = 0;
unsigned long last_lpo = 0;
unsigned long duration;

float ratio = 0;
float concentration = 0;

//Keep eventName the same, this helps the webhook forward your data.
//Change MySiteID to name your device.
const char * eventName = "env-vals";
const char * MySiteID = "S. Oakland Lafayette IN";

float field1;
float field2;
float field3;
float field4;
float field5;
float field6;
float field7;
float field8;
char msg[256];       // Character array for the snprintf Publish Payload

void setup()
{
    Serial.begin(9600);
    delay(50);

    // Wait for serial to be ready (optional, for debugging)
    waitFor(Serial.isConnected, 10000);

    // Start with cellular on
    Cellular.on();
    Particle.connect();

    // Initialize all sensors and display
    initializeSensors();
    initializeDisplay();

    Serial.println("Air Quality sensor started with cellular power management");
    activeStartTime = millis();
    lastInterval = millis();
    measurementTaken = false;
}

void loop()
{
    if (isActive) {
        // Continuous dust sensor readings during active period
        duration = pulseIn(DUST_SENSOR_PIN, LOW);
        lowpulseoccupancy = lowpulseoccupancy + duration;

        // Check if it's time to take full sensor measurements and publish
        if ((millis() - lastInterval) > SENSOR_READING_INTERVAL && !measurementTaken) {
            takeSensorMeasurements();
            measurementTaken = true;
        }

        // Check if active period is complete
        if (millis() - activeStartTime >= MEASUREMENT_TIME) {
            enterSleepMode();
        }

        // Small delay to prevent excessive CPU usage
        delay(100);
    }
}

void initializeSensors() {
    // Configure the dust sensor pin as an input
    pinMode(DUST_SENSOR_PIN, INPUT);

    if (aqSensor.init()) {
        Serial.println("Air Quality Sensor ready.");
    } else {
        Serial.println("Air Quality Sensor ERROR!");
    }

    if (bme.begin()) {
        Serial.println("BME280 Sensor ready.");
    } else {
        Serial.println("BME280 Sensor ERROR!");
    }
}

void initializeDisplay() {
    Wire.begin();
    SeeedOled.init();

    SeeedOled.clearDisplay();
    SeeedOled.setNormalDisplay();
    SeeedOled.setPageMode();

    SeeedOled.setTextXY(2, 0);
    SeeedOled.putString("FNR498");
    SeeedOled.setTextXY(3, 0);
    SeeedOled.putString("Sensors");
    SeeedOled.setTextXY(4, 0);
    SeeedOled.putString("Initializing");

    delay(2000);

    SeeedOled.setTextXY(5, 0);
    SeeedOled.putString("Warm-Up");
    delay(3000);
}

void takeSensorMeasurements() {
    Serial.println("Taking full sensor measurements...");

    int temp, pressure, humidity;
    String quality = getAirQuality();
    int qual_int = aqSensor.slope();

    Serial.printlnf("Air Quality: %s", quality.c_str());

    getBMEValues(temp, pressure, humidity);
    Serial.printlnf("Temp: %d", temp);
    Serial.printlnf("Pressure: %d", pressure);
    Serial.printlnf("Humidity: %d", humidity);

    getDustSensorReadings();

    updateDisplay(temp, humidity, pressure, quality, qual_int);

    // Prepare data for publishing
    field1 = temp;
    field2 = pressure;
    field3 = humidity;
    field4 = aqSensor.slope();
    field5 = aqSensor.getValue();

    if (lowpulseoccupancy > 0) {
        field6 = lowpulseoccupancy;
        field7 = ratio;
    }

    // Publish the data
    publishSensorData();

    // Reset for next cycle
    lowpulseoccupancy = 0;
    lastInterval = millis();
}

void publishSensorData() {
    // Wait for cloud connection if needed
    if (!Particle.connected()) {
        Serial.println("Waiting for cellular cloud connection...");
        waitFor(Particle.connected, 120000); // Extended timeout for cellular (2 minutes)
    }

    if (Particle.connected()) {
        // Create JSON payload with sensor data (same format as original)
        snprintf(msg, sizeof(msg),
            "{\"temp\":\"%.2f\", \"pressure\":\"%.1f\", \"humidity\":\"%.2f\", \"aq_slope\":\"%.2f\", \"voc_level\":\"%.3f\", \"lowpulseoccupancy\":\"%.2f\", \"dust\":\"%.1f\", \"deviceid\":\"%s\"}",
            field1, field2, field3, field4, field5, field6, field7, MySiteID);

        Serial.println("Publishing sensor data via cellular...");
        Serial.println(msg);

        bool published = Particle.publish(eventName, msg, PRIVATE, NO_ACK);
        if (published) {
            Serial.println("Data published successfully to webhook");
        } else {
            Serial.println("Failed to publish data");
        }

        // Give time for publish to complete
        delay(3000); // Slightly longer for cellular
    } else {
        Serial.println("No cellular connection - skipping publish");
    }
}

void enterSleepMode() {
    Serial.println("Preparing for ultra low power sleep...");

    // Update display before sleep
    SeeedOled.clearDisplay();
    SeeedOled.setTextXY(2, 0);
    SeeedOled.putString("Entering");
    SeeedOled.setTextXY(3, 0);
    SeeedOled.putString("Sleep Mode");
    SeeedOled.setTextXY(4, 0);
    SeeedOled.putString("15 minutes");
    delay(2000);

    // Clear display to save power
    SeeedOled.clearDisplay();

    Serial.println("Turning off cellular modem...");

    // Disconnect from Particle Cloud
    Particle.disconnect();

    // Turn off cellular modem
    Cellular.off();

    // Give sensors time to complete any operations
    delay(2000);

    Serial.println("Entering 15-minute sleep mode");
    Serial.flush(); // Ensure all serial data is sent

    // Enter ultra low power sleep mode for 15 minutes
    SystemSleepConfiguration config;
    config.mode(SystemSleepMode::ULTRA_LOW_POWER)
          .duration(SLEEP_PERIOD * 1000); // Convert seconds to milliseconds

    // System will wake up here after 15 minutes
    SystemSleepResult result = System.sleep(config);

    // Code resumes here after wake up
    wakeUp();
}

void wakeUp() {
    Serial.begin(9600);
    delay(1000); // Give serial time to initialize

    Serial.println("Waking up from 15-minute sleep...");
    Serial.println("Reinitializing systems...");

    // Reinitialize all sensors
    initializeSensors();
    delay(1000);

    // Reinitialize display
    initializeDisplay();

    Serial.println("Turning cellular back on...");

    // Turn cellular back on
    Cellular.on();

    // Give cellular time to establish connection
    delay(5000); // Cellular typically takes longer than WiFi

    // Reconnect to Particle Cloud
    Particle.connect();

    Serial.println("Returning to active mode");

    // Reset timing variables
    isActive = true;
    activeStartTime = millis();
    lastInterval = millis();
    measurementTaken = false;
    lowpulseoccupancy = 0;
    last_lpo = 0;
}

// Original sensor functions (unchanged)
String getAirQuality() {
    int quality = aqSensor.slope();
    String qual = "None";

    if (quality == AirQualitySensor::FORCE_SIGNAL) {
        qual = "Danger";
    } else if (quality == AirQualitySensor::HIGH_POLLUTION) {
        qual = "High Pollution";
    } else if (quality == AirQualitySensor::LOW_POLLUTION) {
        qual = "Low Pollution";
    } else if (quality == AirQualitySensor::FRESH_AIR) {
        qual = "Fresh Air";
    }

    return qual;
}

int getBMEValues(int &temp, int &humidity, int &pressure) {
    temp = (int)bme.readTemperature();
    pressure = (int)(bme.readPressure() / 100.0F);
    humidity = (int)bme.readHumidity();

    return 1;
}

void getDustSensorReadings() {
    // This particular dust sensor returns 0s often, so let's filter them out by making sure we only
    // capture and use non-zero LPO values for our calculations once we get a good reading.
    if (lowpulseoccupancy == 0) {
        lowpulseoccupancy = last_lpo;
    } else {
        last_lpo = lowpulseoccupancy;
    }

    ratio = lowpulseoccupancy / (SENSOR_READING_INTERVAL * 10.0);                   // Integer percentage 0=>100
    concentration = 1.1 * pow(ratio, 3) - 3.8 * pow(ratio, 2) + 520 * ratio + 0.62; // using spec sheet curve

    Serial.printlnf("LPO: %d", lowpulseoccupancy);
    Serial.printlnf("Ratio: %f%%", ratio);
    Serial.printlnf("Concentration: %f pcs/L", concentration);
}

void updateDisplay(int temp, int humidity, int pressure, String airQuality, int qual_int) {
    SeeedOled.clearDisplay();

    SeeedOled.setTextXY(0, 3);
    SeeedOled.putString(airQuality);

    SeeedOled.setTextXY(1, 0);
    SeeedOled.putString("VOC Levels: ");
    SeeedOled.putNumber(qual_int);

    SeeedOled.setTextXY(2, 0);
    SeeedOled.putString("Temp: ");
    SeeedOled.putNumber(temp);
    SeeedOled.putString("C");

    SeeedOled.setTextXY(3, 0);
    SeeedOled.putString("Humidity: ");
    SeeedOled.putNumber(humidity);
    SeeedOled.putString("%");

    SeeedOled.setTextXY(4, 0);
    SeeedOled.putString("Press: ");
    SeeedOled.putNumber(pressure);
    SeeedOled.putString(" hPa");

    if (concentration > 1) {
        SeeedOled.setTextXY(5, 0);
        SeeedOled.putString("Dust: ");
        SeeedOled.putNumber(concentration); // Will cast our float to an int to make it more compact
        SeeedOled.putString(" pcs/L");
    }
}
Configuring a webhook.
Now that your data are being streamed to the Particle’s servers on the web, we need to tell the servers where we’re going to store the data. We do this with a webhook that essentially reroutes our data.
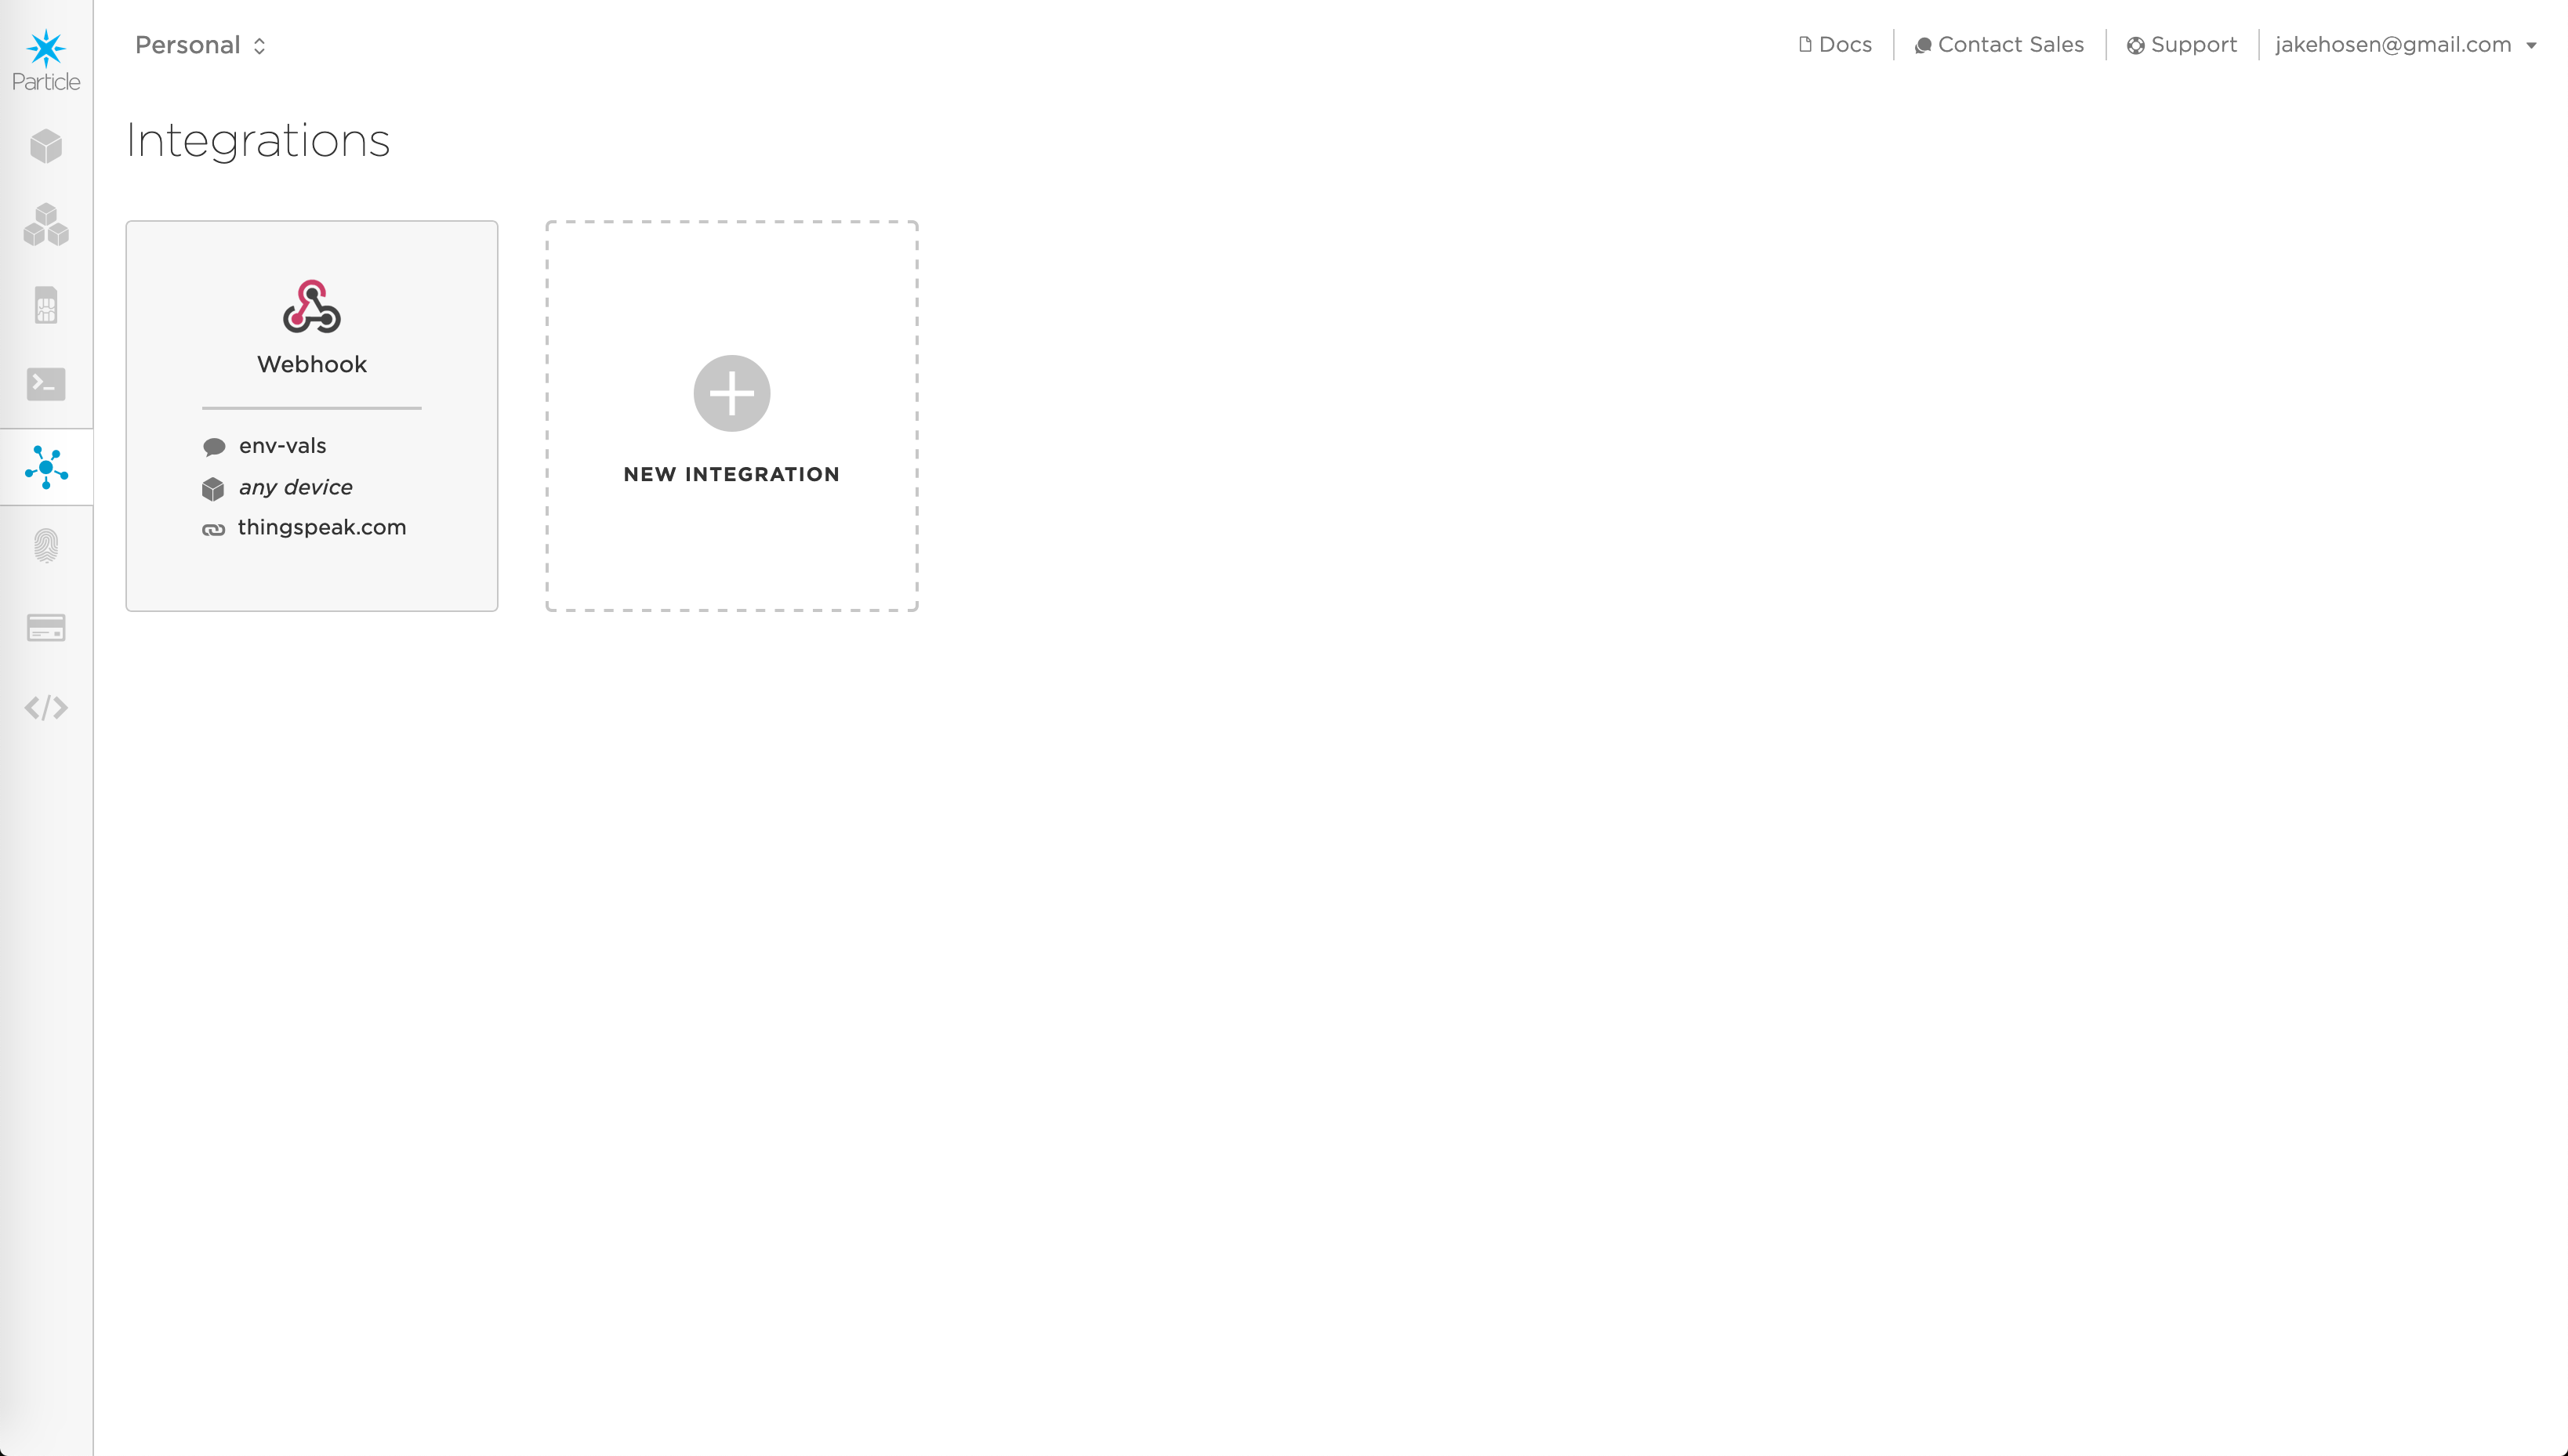
To setup a webhook, go to console.particle.io and login with the account you’ve created. On the left side of the webpage are a bunch of icons that have labels that pop up when you hover the mouse over them. Click on the one that says “integrations”. When you do that you will see a page like the one below. Click on the box with the (+) labeled “New Integration”:
From here, we are going to configure a webhook, so click on the box
labeled webhook on the next page (as seen below). 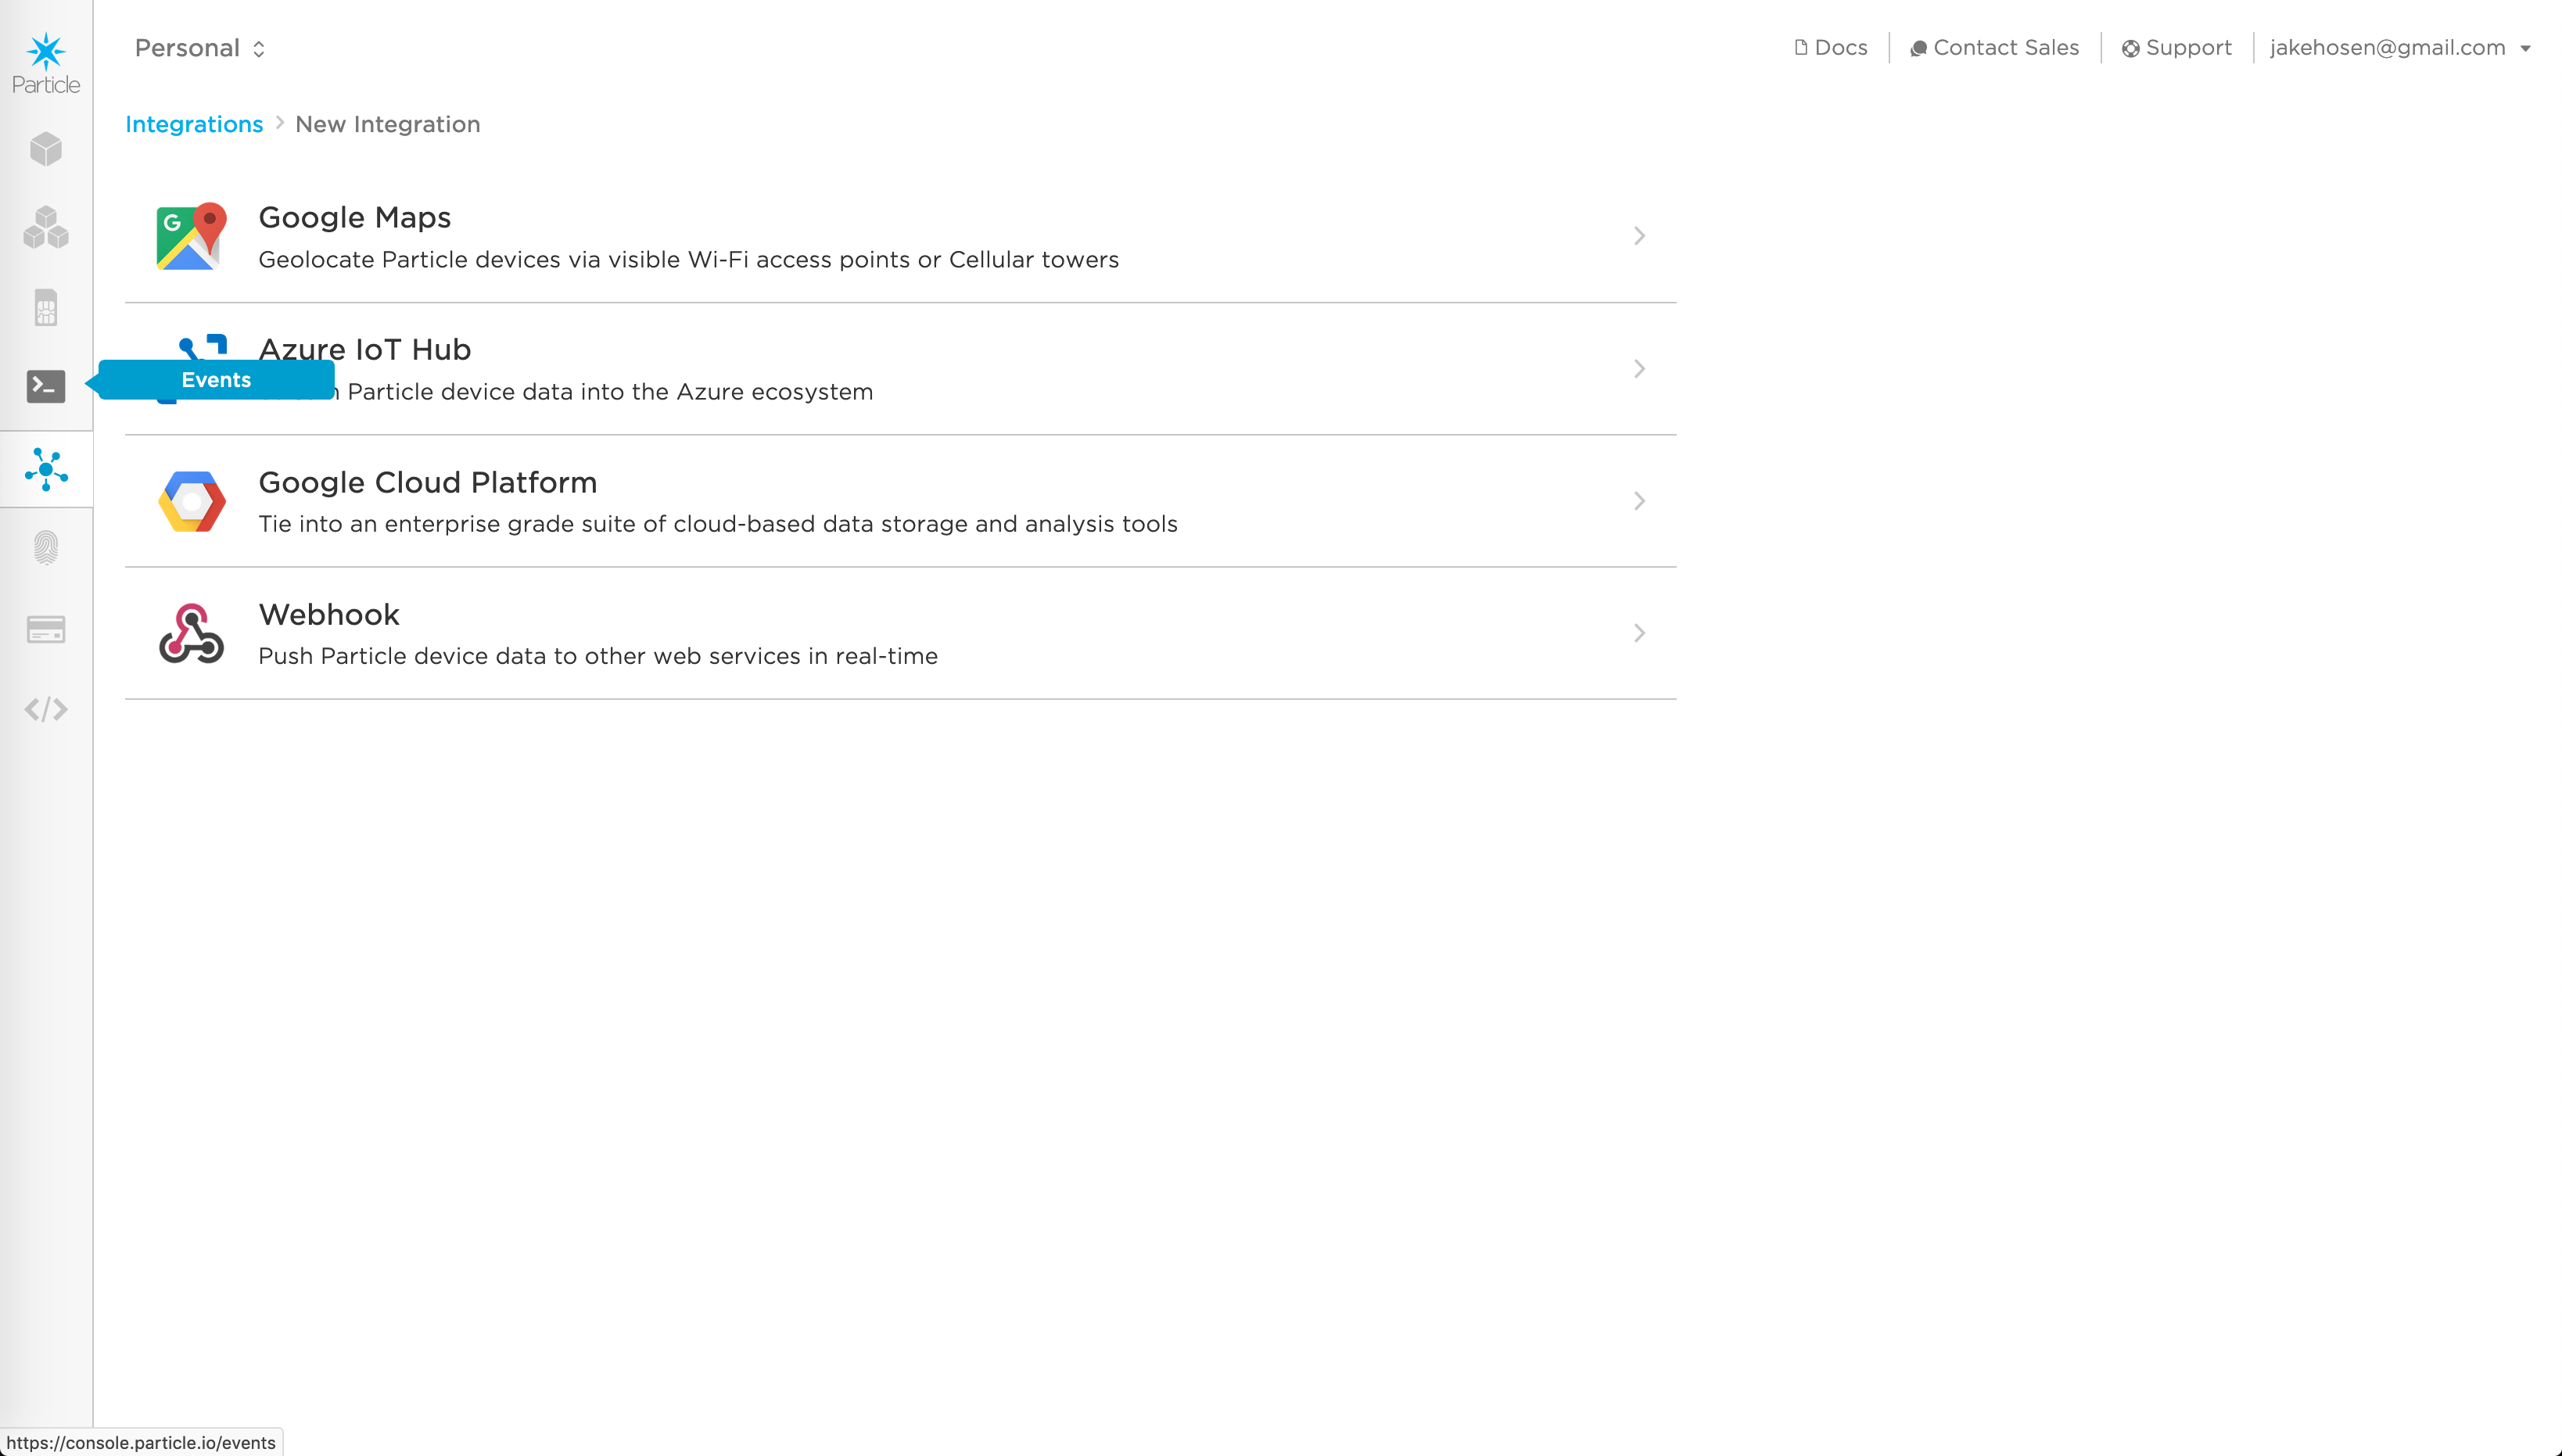 Once you have clicked this button, you will see a webform like the one
below. We will enter information about the GeoEDF server at MyGeoHub
that will be receiving our data in this webform. This will tell the
Particle servers how to forward the data collected on our sensors to the
database hosted at mygeohub.org.
Once you have clicked this button, you will see a webform like the one
below. We will enter information about the GeoEDF server at MyGeoHub
that will be receiving our data in this webform. This will tell the
Particle servers how to forward the data collected on our sensors to the
database hosted at mygeohub.org. 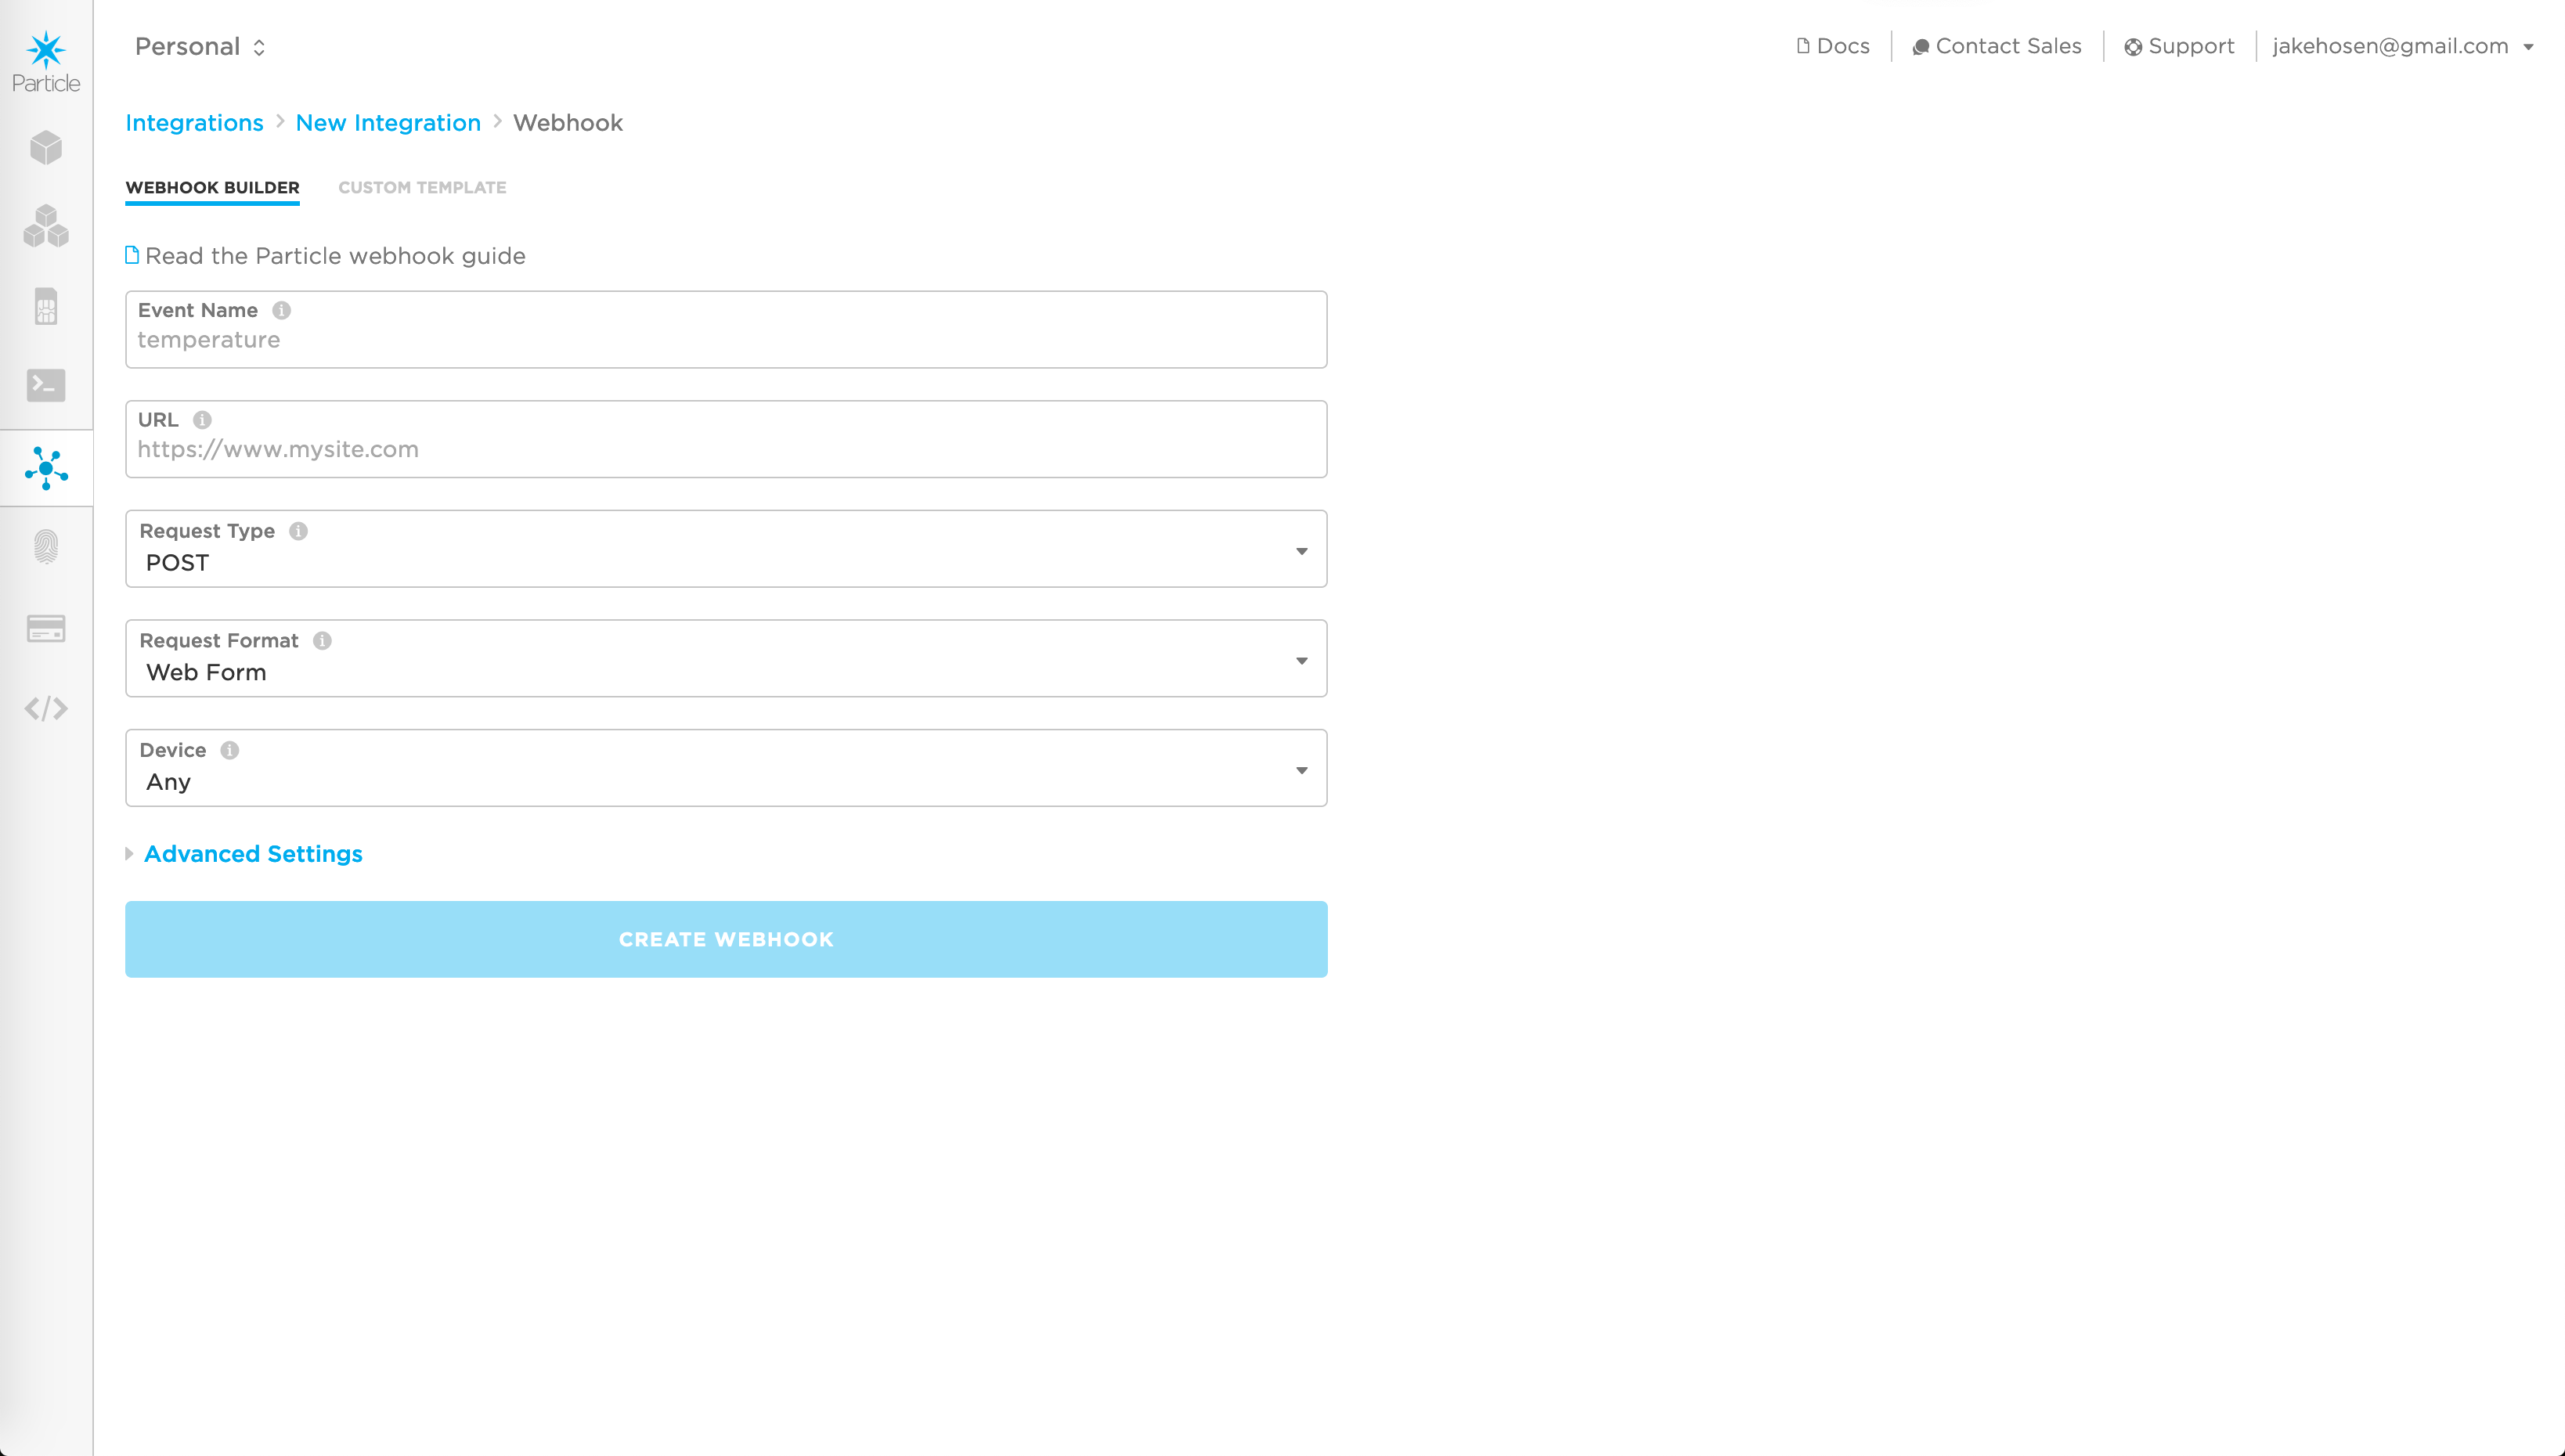
You should fill out the form like you see below. The event name
should be “env-vals”, the url should be “https://api.streamci.org:8792/data”, the request type
should be set to “POST”, the request format should be set to “JSON” and
the device can be set to “Any” since we have a device ID parameter in
the JSON object to keep track of each device. When you are done your
form should look like the one below. 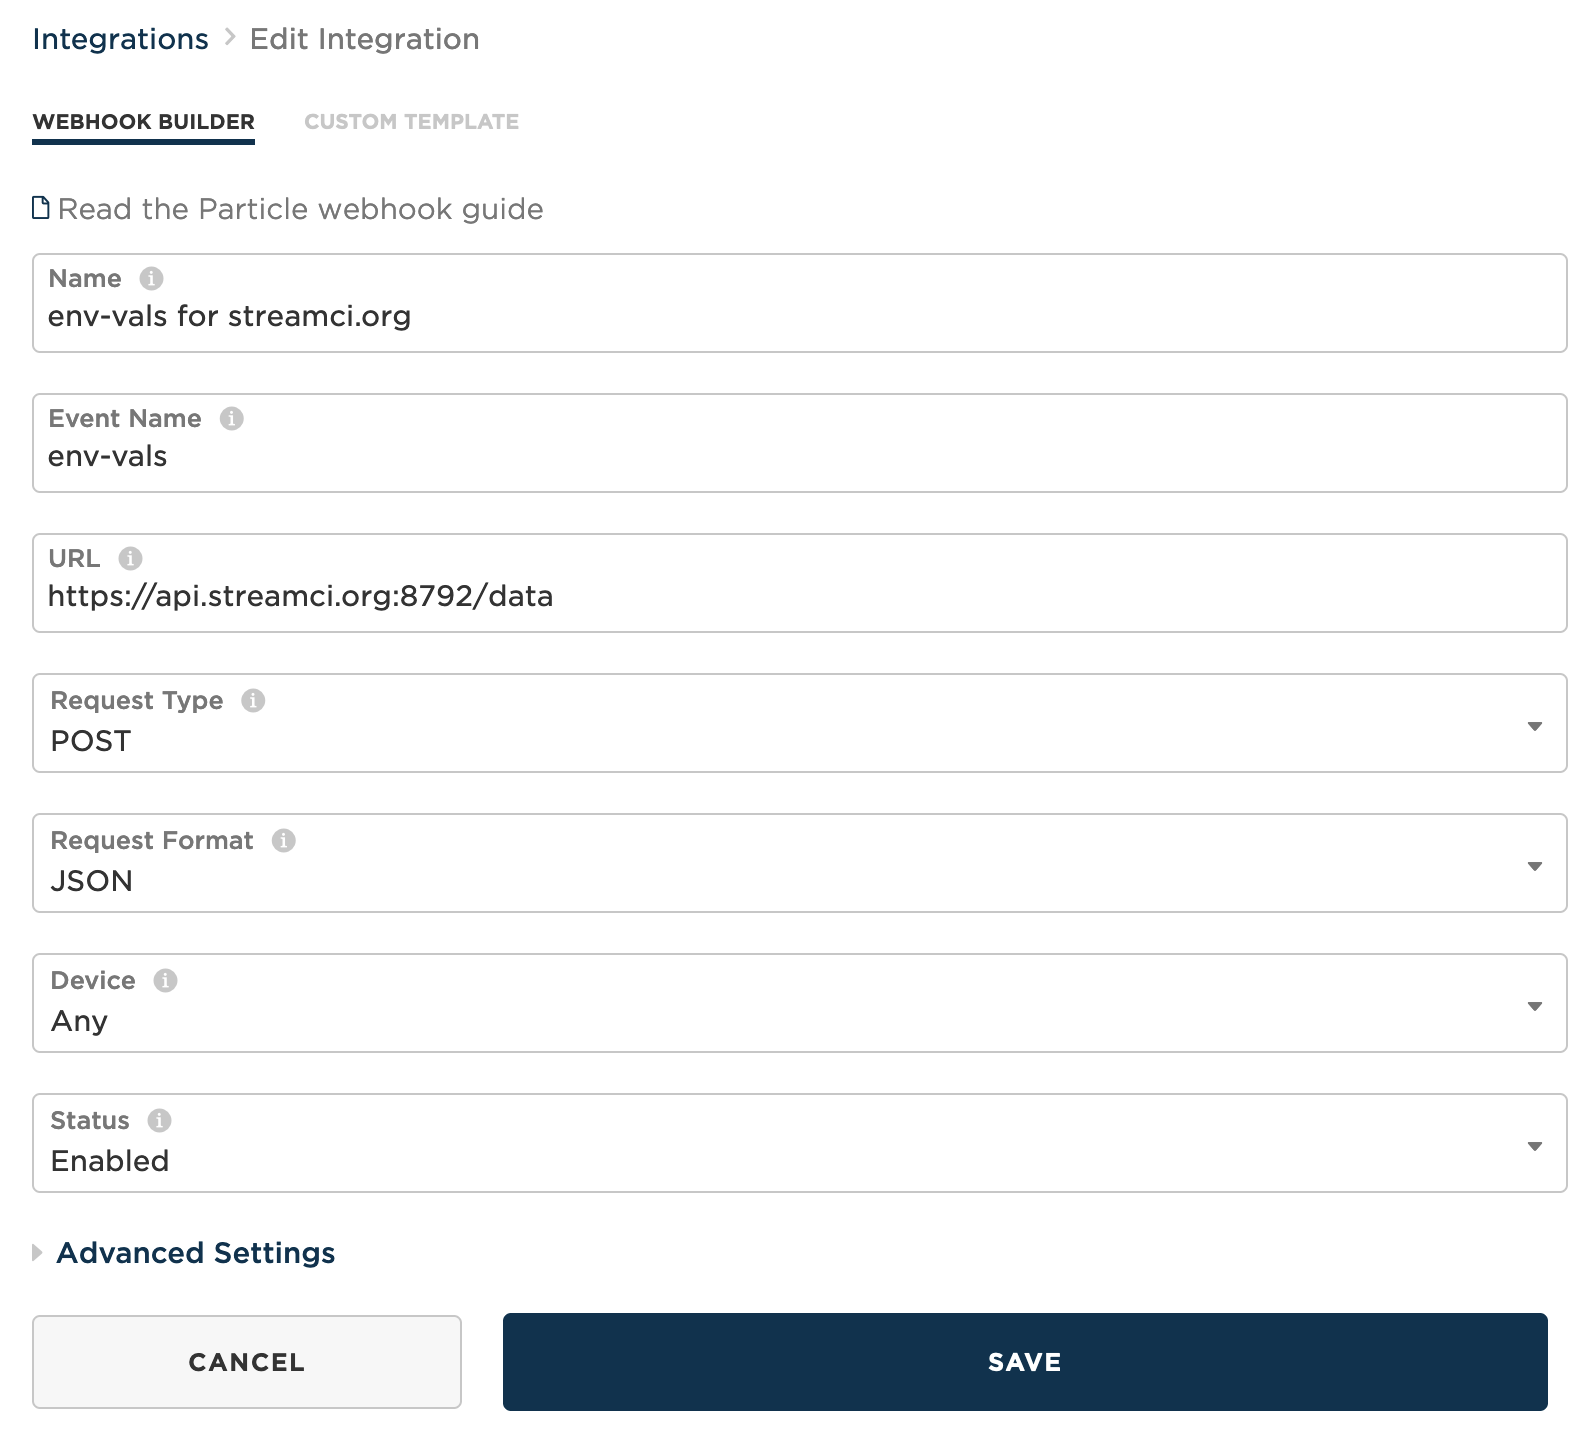
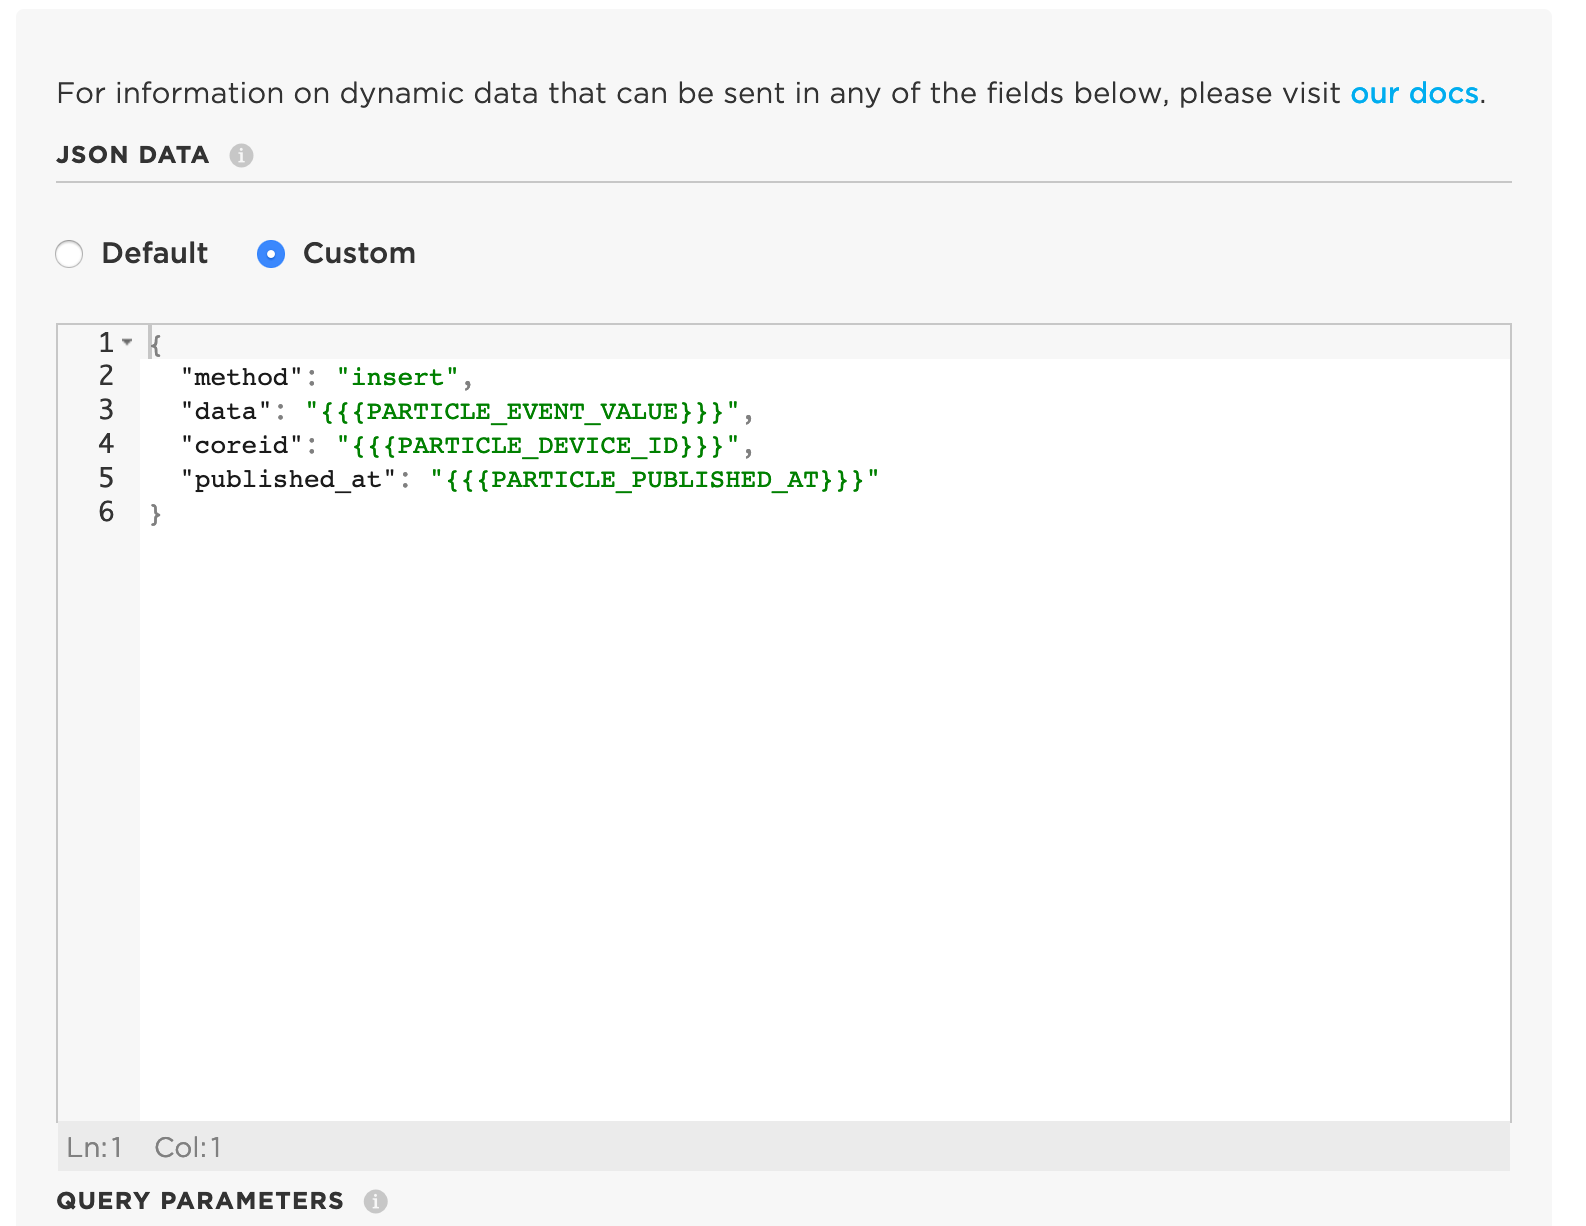
Now, click on Advanced Settings. Click the radio button under JSON that says “Custom” and then paste the following code into the resulting textbox. When you’re done your page should look like the picture below.
{
  "auth": {
    "target": "aqsensors",
    "authtype": "secret",
    "secret_key": "a)woKE039Bje^38spnKIndWI*jse1nkl"
  },
  "request": {
    "method": "insert",
    "data": {
      "temp": "{{{temp}}}",
      "pressure": "{{{pressure}}}",
      "humidity": "{{{humidity}}}",
      "aq_slope": "{{{aq_slope}}}",
      "voc_level": "{{{voc_level}}}",
      "lowpulseoccupancy": "{{{lowpulseoccupancy}}}",
      "dust": "{{{dust}}}",
      "deviceid": "{{{deviceid}}}",
      "coreid": "{{{PARTICLE_DEVICE_ID}}}",
      "published_at": "{{{PARTICLE_PUBLISHED_AT}}}"
    }
  }
}
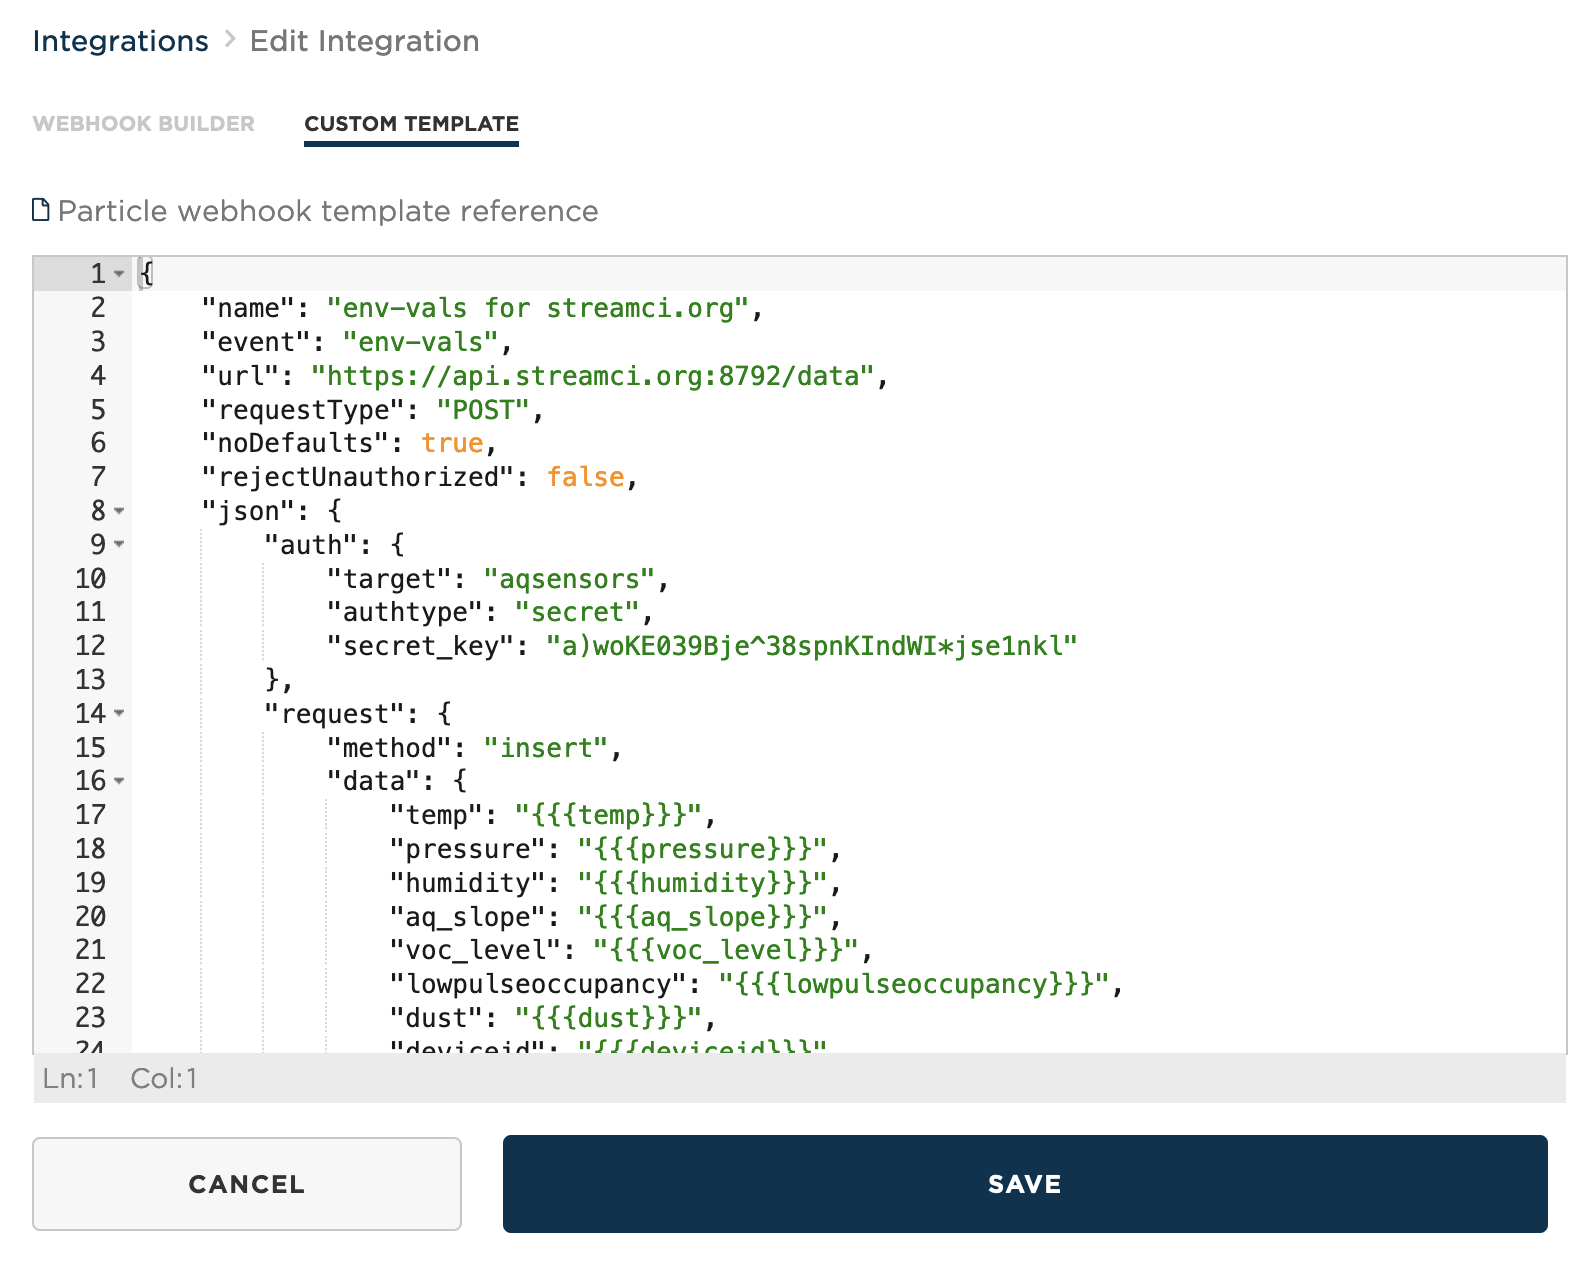
Now you have one more thing to do. Scroll back to the top and select “CUSTOM TEMPLATE”. From there you want to paste the following code into the text box labeled “Particle webhook template reference”. When you are done and your page looks like below, you are ready to hit SAVE!
{
    "event": "env-vals",
    "url": "https://api.streamci.org:8792/data",
    "requestType": "POST",
    "noDefaults": true,
    "rejectUnauthorized": false,
    "json": {
        "auth": {
            "target": "aqsensors",
            "authtype": "secret",
            "secret_key": "a)woKE039Bje^38spnKIndWI*jse1nkl"
        },
        "request": {
            "method": "insert",
            "data": {
                "temp": "{{{temp}}}",
                "pressure": "{{{pressure}}}",
                "humidity": "{{{humidity}}}",
                "aq_slope": "{{{aq_slope}}}",
                "voc_level": "{{{voc_level}}}",
                "lowpulseoccupancy": "{{{lowpulseoccupancy}}}",
                "dust": "{{{dust}}}",
                "deviceid": "{{{deviceid}}}",
                "coreid": "{{{PARTICLE_DEVICE_ID}}}",
                "published_at": "{{{PARTICLE_PUBLISHED_AT}}}"
            }
        }
    }
}