Git Basics
Contents
Creating and Cloning Repositories
- There are two ways to get a repository on your computer to start your work:
- Create a new repository.
- Clone someone else’s repository (or one that you’ve created previously).
Cloning a respository
Now we’re going to clone the repository with these documents onto your local computer. On the repository’s GitHub page, click the green Code button, switch the tab to SSH, and copy the URL. It’ll look like:
git@github.com:username/repo-name.git
Then, in the directory where you want the repo to live:
git clone git@github.com:username/repo-name.git
You’ll get a new folder named after the repository, with the full history downloaded.
To clone into a specific folder name instead, pass it as an extra argument:
git clone git@github.com:username/repo-name.git my-folder-name
Creating a new repository
Here you are going to make a brand new repository that is owned by you. Make sure you do not put it in a subfolder of the git-workshop or any other repository.
- Go to GitHub.com and click the button labeled
Newon the top left of your screen. Graphic showing ‘new’ button on the top left corner of the GitHub website. - On the next page, fill in the name of your new repository and a description. Keep the repository visible. You can add a readme on this screen or you can add it as part of the next step.
- Once you’re done, click the
Create Repositorybutton. - Now go to the command line to create the repository locally.
- You want to navigate the terminal so that you are in the directory into which you want to put your new repository. You can use the
cdcomand to get into the right place and then you can make a new directory for the git workshop materials as follows:mkdir git-workshop. Then typecd git-workshop. That will put you in the folder for cloning your directory.- You want to save your repository in your home directory,
Documents,Desktop, or similar. Don’t use the root directory (c:/or/) and don’t use system folders likec:/windows.
- You want to save your repository in your home directory,
- Using the following commands (copy and paste from the GitHub the version specific to your repository)
echo "# example" >> README.md git init git add README.md git commit -m "first commit" git branch -M main git remote add origin git@github.com:jakehosen/example.git git push -u origin main - Note: Before entering the commands above, make sure that you have created a folder with the name of the repository and then navigated in the terminal into that folder.
Using .gitignore
.gitignore: This is a file that tells Git what files should be excluded even when running a command to stage all files (git add .). This is essential for macOS users. In each folder, macOS will put a hidden file called .DS_Store. If you don’t add it to your .gitignore, all your directories will have this file listed. It gets annoying.
Creating a New Commit from the Command Line
To follow along, add a file called example.r with some basic R code (just one line is enough) to the new repository you’ve created.
A commit is a saved snapshot of your project at a moment in time. Making one is a three-step rhythm: check what changed, stage what you want to save, commit it with a message.
git status
You’ll get output that looks something like:
On branch main
Changes not staged for commit:
  modified:   analysis.R
  modified:   README.md

Untracked files:
  notes.txt
Three categories to recognize:
- Modified — tracked files that have changed since the last commit.
- Untracked — new files git has never seen before.
- Staged — changes you’ve already marked for the next commit (none yet).
If you want to see the actual line-by-line changes (not just which files changed):
git diff
Stage and push changes in a commit
Staging is how you tell git which changes belong in this commit. You don’t have to commit everything at once — you can group related changes together and leave others for later.
Make some small changes to your file and then follow the instructions below
Stage a single file: Maybe you just want to track the one file you just added. You can do that as follows:
git add example.r
Stage more than one specific file:
git add example.r README.md
Stage everything that’s changed or new (most common approach):
git add .
The . means “everything in the current directory and below.” Use it when you genuinely want all changes; otherwise, name files explicitly so you don’t accidentally commit something like a half-written scratch file.
Run git status again to confirm — staged files will appear in green under “Changes to be committed.”
Commit with a message
Now commit the selected files to a snapshot:
git commit -m "Add LOESS smoothing to baseline correction"
The -m flag lets you write the message inline. If you leave it off, git opens your default editor so you can write a longer message — useful when one line isn’t enough.
Push your changes
Presuming you are connected to the internet, you can now push your changes using git push. You can stage more than one commit before using git push.
Try pushing a commit yourself
Add or change a file inside the new repository you created and then following the instructions to use git add, git commit, and git push to stage and push your commit.
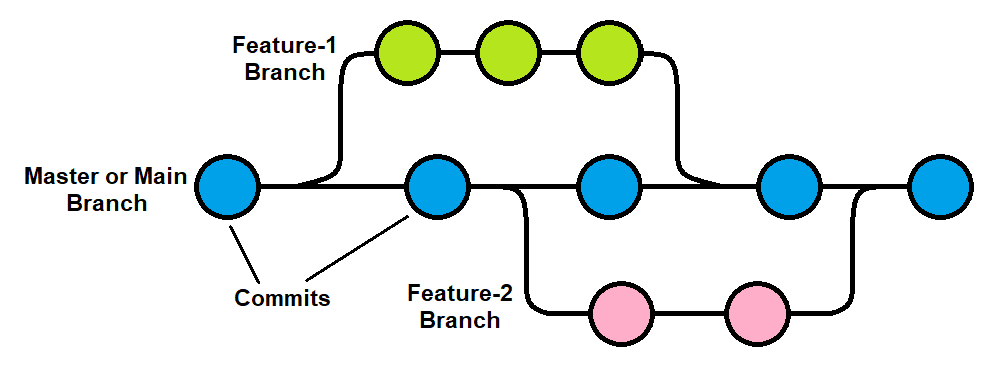
Branches
A key feature of Git is the ability to create and then subsequently merge branches. This allows you to test new things and allows different people to develop and debug code features independently.
Automatically setup branch tracking
If you do not run the following command, you will have to tell the software manually each time which branch should be attached. I recommend running this so you don’t have to worry about it.
git config --global push.autoSetupRemote true
See which branch you’re on
Start by checking where you are:
git branch
You’ll see a list of branches, with an asterisk next to your current one:
* main
If you’ve never made a branch before, that’s the only one you’ll see.
Create a new branch
Make a new branch with a descriptive name:
git branch try-new-algorithm
Run git branch again and you’ll see both:
* main
  try-new-algorithm
Notice the asterisk is still on main. Creating a branch doesn’t switch to it. It just makes the branch exist.
Naming branches
Use short, descriptive names. A few conventions you’ll see:
feature/add-export-buttonfix/typo-in-readmeexperiment/new-smoothing-method
Slashes are allowed and help group related branches. Spaces are not — use hyphens or underscores instead.
Switch to a branch
To move onto your new branch:
git switch try-new-algorithm
Run git branch once more:
  main
* try-new-algorithm
The asterisk has moved. You’re now working on try-new-algorithm. Any commits you make from here will land on this branch, not on main.
Shortcut: You can create and switch in one step with
git switch -c try-new-algorithm. The-cstands for “create.”
Older command: You may see tutorials use
git checkoutinstead ofgit switch. Both work, butgit switchis newer and clearer.checkoutdoes a lot of other things too, which is whyswitchwas introduced.
Work on the branch
Make changes, stage them, and commit as usual:
git add .
git commit -m "Try LOESS smoothing instead of moving average"
This commit lives only on the try-new-algorithm branch. If you switch back to main, you won’t see it.
To prove it to yourself:
git switch main
Your files on disk will revert to whatever main looks like — your new changes seem to vanish. They haven’t; they’re safely sitting on the other branch. Switch back:
git switch try-new-algorithm
And your changes reappear. Git is swapping the contents of your folder as you move between branches.
Merge the branch back in
If your experiment worked and you want the changes on main, merge them in.
First, switch to the branch you want to merge into:
git switch main
Then merge the other branch into the current one:
git merge try-new-algorithm
If there are no conflicts, git applies the commits from try-new-algorithm onto main and you’re done.
Handle a merge conflict (if one happens)
A conflict happens when the same lines of a file changed on both branches and git can’t tell which version to keep. You’ll see something like:
CONFLICT (content): Merge conflict in analysis.R
Automatic merge failed; fix conflicts and then commit the result.
Open the conflicting file. Git marks the conflicting region like this:
<<<<<<< HEAD
result <- mean(values)
=======
result <- median(values)
>>>>>>> try-new-algorithm
The top section (between <<<<<<< and =======) is what’s on your current branch. The bottom section (between ======= and >>>>>>>) is what’s coming in from the other branch.
Edit the file to keep what you actually want — delete the markers and either version’s lines, leaving the final result. Then:
git add analysis.R
git commit
Git will pre-fill a commit message for you. Save and close.
Key commands
List all branches, including ones on the remote:
git branch -a
See branches with their most recent commit:
git branch -v
Rename the branch you’re currently on:
git branch -m new-name
Remove changes you started but don’t want to keep (before committing):
git restore .
This reverts unstaged changes in your working folder. Useful when an experiment isn’t going anywhere and you want a clean slate to switch branches.
Temporarily save uncommitted changes that you have made locally
git stash
This could be used if you want to switch branches, but you have changes on the current branch that you are not ready to put into a commit.
Example: Rewind to a previous commit and make a new branch.
Sometimes you want to go back to an earlier point in your project and try a different direction from there without losing the commits that came after. The safest way to do this is to leave your main branch alone and start a new branch from an earlier commit.
!(Conceptual diagram depicting moving to a previous commit and creating a new branch in Git)[images/branch-from-earlier-commit.png]
Step 1: Find the commit you want to go back to
List your recent commits with their hashes:
git log --oneline
You’ll see something like:
a3f9c2d (HEAD -> main) Refactor analysis loop
b7d1e44 Add second smoothing pass
2e8a91f Add LOESS baseline correction
9c4f6b1 Initial commit
The short string on the left of each line (e.g. 2e8a91f) is the commit hash. Pick the one you want to branch from and copy it.
Step 2: Create a new branch from that commit
In a single command:
git switch -c new-direction 2e8a91f
new-directionis the name of your new branch — call it whatever fits.2e8a91fis the commit hash you chose.
That’s it. You’re now on a fresh branch that starts at that earlier commit.
Step 3: Confirm where you are
Run:
git log --oneline
You’ll see the history up to your chosen commit, but not the commits that came after on main. Those still exist — they’re just on main, not here.
Exercise: Resolve a conflict
Create a new repository on github
Using the instructions above, create a repository. Use the instructions on the GitHub website to initialize the repository on your computer.
Add a file
Once you have created the repository on GitHub and have a local version downloaded, add a file. Let’s make a small markdown file called produce.md using nano.
- Make sure that you are in the repository directory on your terminal.
- Use nano to create and open the file using
nano produce.md. Alternatively you can open with vim usingvim produce.md. - Add the following text to the markdown file:
Washington State Agricultural Product: [Add One] - If you are using nano you can use
ctrl+xto save and exit your file (pressythenenterto confirm). If you are using vim, hit theescapekey and then type:wqfollowed by enter. - Commit this starting version to
mainso the file exists on both branches you’re about to work with:git add produce.md git commit -m "add produce.md" git push
Make a new branch and edit the markdown file
- Create a new branch and switch to it:
git switch -c first_product - Use your text editor of choice to replace
[Add One]with an agricultural product. - Commit and push your changes. Because this branch doesn’t yet exist on GitHub, the first push needs to set the upstream:
git add .
git commit -m "first product"
git push -u origin first_product
Switch back to main and edit the markdown file with a conflicting product
- Switch back to main with
git switch main. - Use your text editor of choice to replace
[Add One]with an agricultural product that is different from the one that you put on your branch. - Commit your change on
main:git add . git commit -m "different product on main" - Then merge your branch into main:
git merge first_product.
Resolve your conflict
Because main and first_product both changed the same line of produce.md, git can’t merge them automatically and will report a conflict. Your job is to tell git which version you want (or write a new version that combines them).
- Check which files are conflicted:
git statusYou should see
produce.mdlisted under “Unmerged paths.” - Open
produce.mdin your editor. Git has inserted conflict markers that look like this:Washington State Agricultural Product: <<<<<<< HEAD cherries ======= apples >>>>>>> first_productThe text between
<<<<<<< HEADand=======is the version currently onmain. The text between=======and>>>>>>> first_productis the version coming in from your branch. - Edit the file to look the way you want the final version to look, and delete all three marker lines (
<<<<<<<,=======,>>>>>>>). For example, if you want to keep both:Washington State Agricultural Product: cherries and apples - Save and exit (
ctrl+x,y,enterin nano;escthen:wqin vim). - Stage the resolved file and complete the merge:
git add produce.md git commit -m "resolve merge conflict in produce.md" git push - Confirm the merge is done and the working tree is clean:
git statusYou should see “nothing to commit, working tree clean.”